
A 2×2 grow tent is the perfect starting point for any first-time cannabis grower. It fits in a closet, costs less to run than a larger setup, and gives you enough space to grow one or two plants properly without overwhelming you with variables. Get one first grow right in a 2×2, and you will have the skills and confidence to scale up whenever you want.
This guide walks you through every piece of equipment you need, how to assemble it correctly, and the environment targets to hit at each stage of the grow. No fluff, no missing steps.
Disclosure: WeedMania420 participates in the Amazon Associates Program and other affiliate programs. Purchases made through our links may earn us a small commission at no extra cost to you. We only recommend products we have genuinely researched and believe in.
Table of Contents
Why a 2×2 Tent Is the Right Starting Point
A 2×2 grow tent gives you 4 square feet of growing space, enough for one large photoperiod plant or two to four autoflowers. It keeps costs manageable, climate control simple, and mistakes cheap to fix. If your light placement is off or your ventilation is undersized, the consequences in a small tent are far easier to course-correct than in a 4×4.
90% of beginners should start with a 2×2 or 3×3. You will master climate control in one tent, then size up with full confidence. That logic is sound. A 2×2 also puts less pressure on your electricity bill, which matters for long-term sustainability.
One realistic expectation before you spend anything: a well-run 2×2 with a quality 150W LED can produce 2 to 4 ounces per harvest. With training techniques like LST and a longer veg period, some growers push that to 6 ounces. Your first grow will probably land at the lower end while you learn the environment. That is completely normal.
The Complete Equipment List
Here is everything you need before you start. Nothing on this list is optional.
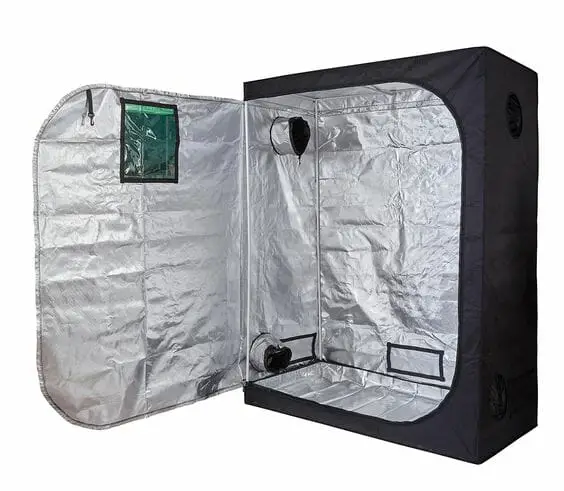
The tent itself A 24x24x55 inch (2x2x4.5 ft) tent is the standard beginner size. Look for 600D canvas or thicker, double-stitched seams, a reflective mylar lining rated 90% or higher, and metal corner connectors rather than plastic. Mars Hydro, AC Infinity, and Spider Farmer all make reliable 2×2 tents in the $60 to $90 range.
LED grow light (150W) The most important purchase. We covered this in detail in our Best LED Grow Lights Under $150 for a 2×2 Tent guide. Short version: Mars Hydro TS1000 (~$109) for best overall value, Spider Farmer SF1000 (~$109) if efficiency is your priority.
Inline fan and carbon filter (4-inch) A 4-inch inline fan rated at 100 to 150 CFM paired with a matching 4-inch carbon filter. AC Infinity CLOUDLINE S4 (~$80) is the most recommended beginner fan for a 2×2. Pair it with any 4-inch carbon filter from our Best Carbon Filters for Grow Tents guide. The fan and filter together are your ventilation and odor control system.
Ducting (4-inch) A 8 to 10 foot section of flexible aluminum ducting connects your carbon filter to the fan and out through the tent’s exhaust port. Usually included in kit purchases, but cheap to buy separately (~$10).
Clip fan (small oscillating) A small 6-inch clip fan inside the tent strengthens stems through gentle air movement and prevents hot spots from forming under the light. Around $15 to $25.
Thermometer/hygrometer You cannot manage what you cannot measure. A basic digital thermometer and hygrometer combo (around $10 to $15) is non-negotiable. The Inkbird or Govee models are popular and accurate enough for a beginner setup.
Growing medium and pots For beginners, soil is the most forgiving medium. Fox Farm Ocean Forest or Canna Terra Professional are excellent starting soils that come pre-loaded with enough nutrients to carry seedlings through their first 4 to 6 weeks. Use 3 to 5 gallon fabric pots for one plant, or 1 to 2 gallon fabric pots for autoflowers.
Nutrients If you use a quality pre-amended soil, you will not need nutrients for the first month. After that, a simple two or three-part nutrient line keeps things manageable. Fox Farm Trio (Grow Big, Tiger Bloom, Big Bloom) is a widely used beginner choice with clear feeding schedules.
pH meter and pH adjustment solution Cannabis roots can only absorb nutrients within a specific pH range (6.0 to 7.0 in soil, 5.5 to 6.5 in hydro). Watering outside that range causes nutrient lockout regardless of how much you feed. A basic pH pen (~$15 to $20) and pH up/down solution is essential from day one.
Timer A mechanical or digital outlet timer controls your light schedule automatically. A basic $10 mechanical timer does the job for most setups.
Estimated budget:
| Item | Estimated Cost |
| 2×2 tent | $60-90 |
| LED grow light (150W) | $99-129 |
| 4-inch inline fan | $60-80 |
| 4-inch carbon filter | $30-50 |
| Ducting | $10-15 |
| Clip fan | $15-25 |
| Thermometer/hygrometer | $10-15 |
| Fabric pots (3-pack) | $10-15 |
| Soil (1 cu ft) | $15-25 |
| Nutrients (starter set) | $30-50 |
| pH meter and solutions | $20-30 |
| Timer | $10-15 |
| Total | $370-539 |

Step-by-Step Assembly
Step 1: Choose Your Location
Before unboxing anything, pick the right spot. Your tent needs to be in a location where you can control access, run ducting to an exhaust point (window, ceiling vent, or adjacent room), and maintain a stable ambient temperature between 60 and 75°F.
Basements and spare closets work well. Garages work in mild climates but can get too cold in winter or too hot in summer. Avoid locations directly under air conditioning vents or next to heat sources.
Step 2: Assemble the Tent Frame
Lay out all the metal poles and connectors on the floor first. Most 2×2 tents go together in under 20 minutes. Start with the four corner uprights, connect the top and bottom horizontal bars, then drape the canvas over the frame and zip it up. Check that all zippers run smoothly and that the mylar lining sits taut against the frame with no bunching.
Once the frame is standing, identify your exhaust port (usually on the top or upper sides), intake ports (lower sides), and any pass-through ports for power cables. Plan your cable management before you put equipment inside.
Step 3: Hang the Light
Most 2×2 tents have a crossbar or hanging rail at the top. Use the included rope hangers (ratchet hangers are the best) to hang your LED at the correct starting height above where your canopy will be. For a 150W LED starting with seedlings, begin at 24 inches above the soil surface. You will lower it gradually as plants grow.
Route the power cable through a cable pass-through port. Keep cables outside the tent as much as possible for heat management.
Step 4: Set Up Ventilation
This is the most important assembly step to get right. The airflow direction matters: air should move from the bottom of the tent upward and out through the top.
Mount your carbon filter inside the tent near the top, using rope hangers from the crossbar. The filter should hang with its flanged opening facing your fan. Connect a short section of ducting from the filter flange to your inline fan. Route the remaining ducting from the fan’s exhaust port out through the tent’s upper exhaust port, then to your exhaust destination.

Seal all duct connections with aluminum foil tape. Any unsealed joint is a potential odor leak and a drop in system efficiency.
Mount your small clip fan on one of the internal uprights at mid-height, angled to gently move air across (not directly into) the tops of your plants.
Step 5: Install Your Timer and Test Everything
Plug your light into the timer and set the schedule before your plants arrive: 18 hours on, 6 hours off for seedlings and veg; 12 hours on, 12 hours off to trigger and maintain flowering in photoperiod strains. Autoflowers do not need a light schedule change.
Plug your inline fan into a power outlet and run it on medium speed. Check that the tent walls are pulling slightly inward under negative pressure. That gentle inward suck on the canvas walls is exactly what you want. It confirms all air is being exhausted through your filter rather than leaking out through the fabric.
Let the tent run for 30 minutes with the light on. Check the temperature and humidity with your thermometer/hygrometer. Aim for 70 to 80°F (21 to 27°C) at canopy level.
Step 6: Prepare Your Growing Medium
Fill your fabric pots with soil, leaving 2 to 3 inches of space at the top for watering. Do not compact the soil. Lightly water it to field capacity (water flows freely from the drainage holes, then stops). Let it sit for 24 hours before introducing seedlings or germinated seeds.
Check the pH of your water before every watering. In soil, target 6.2 to 6.8 pH. Use pH up or pH down solution in small drops, then recheck until you hit the range.
Environment Targets by Growth Stage
Getting your temperature and humidity dialed in is the biggest difference between average grows and good ones. Here are the targets to hit at each stage:

Seedling (weeks 1 to 3) Temperature: 70 to 80°F (21 to 27°C) Humidity: 65 to 80% Light height: 22 to 24 inches above soil Dimmer: 20 to 30% power
Seedlings are fragile and need high humidity to compensate for underdeveloped root systems. They absorb much of their water through their leaves at this stage. Keep the light low in intensity but maintain warmth.
Vegetative stage (weeks 3 to 8, photoperiod) Temperature: 72 to 82°F (22 to 28°C) lights on; 60 to 70°F (16 to 21°C) lights off Humidity: 50 to 70% Light height: 18 to 22 inches above canopy Dimmer: 50 to 70% power
During veg, plants are building their structure. Day temperatures between 22 and 28°C (72 to 82°F) during lights on and 18 to 22°C (64 to 71°F) at night give plants the conditions they need for vigorous, healthy growth.
Flowering stage (weeks 1 to 8 of flower) Temperature: 65 to 80°F (18 to 26°C) lights on Humidity: 40 to 50% early flower, dropping to 35 to 45% in late flower Light height: 16 to 18 inches above canopy Dimmer: 100% power
Flowering plants require more precise environmental control with temperatures between 65 and 80°F (18 to 26°C) and relative humidity levels between 40 and 50%. Lower humidity levels during flowering prevent mold and fungal problems while promoting resin production and flower quality.
Late flower (last 2 weeks before harvest), push humidity down toward 30 to 40% to encourage resin production and reduce the risk of bud rot.
Light Schedules Explained
Photoperiod strains require a specific light schedule to trigger flowering. Run 18 hours of light and 6 hours of darkness during veg. When you are ready to flower (typically after 4 to 8 weeks of veg depending on desired plant size), switch to 12 hours on and 12 hours off. The plant reads the longer dark period as the arrival of autumn and begins producing flowers.
Autoflowering strains flower automatically based on age, not light schedule. Most growers run 18 hours on and 6 hours off from seed to harvest for autoflowers, though some run 20/4 or even 24/0. The flexibility is one reason autoflowers are popular with beginners.
Common Beginner Mistakes to Avoid
Watering too frequently. This is the number one reason first grows fail. Cannabis roots need oxygen, and wet soil smothers them. The correct method: water thoroughly until runoff flows from the drainage holes, then wait until the top inch of soil is dry and the pot feels noticeably lighter before watering again.
Skipping pH management. Even the best nutrients will not work if your pH is wrong. Buy a pH pen and check every watering. It takes 30 seconds and prevents most nutrient deficiency problems.
Starting nutrients too early. Quality pre-amended soil already contains enough nutrients for 4 to 6 weeks. Adding more on top causes nutrient burn. Wait until you see the first signs of yellowing or fading before introducing any feeding.
Overheating during late flower. Temperatures above 85°F in flower degrade terpenes, slow bud development, and invite spider mites. Check canopy temperature specifically (not ambient tent temperature), and adjust your light height or fan speed accordingly.
Not sealing the tent properly. Light leaks and odor leaks come from the same source: unsealed zippers, ports, and duct connections. Run your hand around all seams after setup with the light on in a dark room. Any light you see escaping needs to be addressed.
The First 7 Days
Once your seeds have germinated and you see the seedling emerge above the soil, here is your daily routine for the first week:
Check temperature and humidity morning and evening. Keep a simple notes app on your phone or a notebook to log readings. You will thank yourself later when troubleshooting.
Water only when needed (the lift test: pick up the pot. If it feels light, water. If it still feels heavy, wait). At seedling stage, this is typically every 2 to 3 days.
Observe your plants rather than touching them. Look at leaf color (should be bright green), stem thickness (should be sturdy, not stretchy), and whether the plant is tracking toward the light evenly.
Adjust your light height if you see stretching (raise the light, increase intensity) or bleaching or clawing (lower intensity, raise the light).
Recommended Strains for a First 2×2 Grow
Compact, forgiving genetics make a first grow far more enjoyable. These strains are widely recommended for beginners in small tents:
Northern Lights (autoflower or photoperiod) — One of the most resilient strains ever developed. Compact, heavy yielder, and very tolerant of beginner mistakes. Perfect for a 2×2.
White Widow Auto — Fast finishing, around 10 to 11 weeks from seed to harvest, manageable height, and strong resin production.
Blue Dream (photoperiod) — Can stretch in veg, but with low-stress training (LST) fits a 2×2 well. High yields and a forgiving feeder.
Gorilla Glue Auto — Dense, potent, and compact. One of the best-performing autoflowers in a small tent.
All four of these strains are available from ILGM, which offers a germination guarantee on every order. If a seed does not sprout, they replace it. Worth the peace of mind for your first grow.
Conclusion
A 2×2 tent setup does not need to be complicated or expensive. The equipment list above covers everything you need for a complete, functional grow from seed to harvest. Spend a little more on your light (it matters more than anything else) and use that budget saving on a quality tent with good light-proofing and sturdy construction.
The most important thing you can do in your first grow is pay attention. Check your tent daily, log your numbers, and respond to what your plants are telling you. Cannabis is a communicative plant. Leaves that are dark green, slightly waxy, and reaching toward the light are happy. Everything else is a conversation you can learn to read.